Monday, 3 September 2012

THIS IS THE IKEA TV

IKEA TV IS HERE
The Swedish furniture maker plans to launch a complete system composed of advanced TV, DVD player, blue ray player and audio system - all incorporated into one unit available in a variety of colors.
A few weeks ago, IKEA has surprised the world by announcing a new product: UPPLEVA (in translation from Swedish - "experience")
IKEA TV features:
- Full HD TV
- DVD player
- wi-fi capable
- applications (currently about 20 are in tests)
- 2.1 sound system, wireless subwoofer
- a variety of cabinet colors to choose from
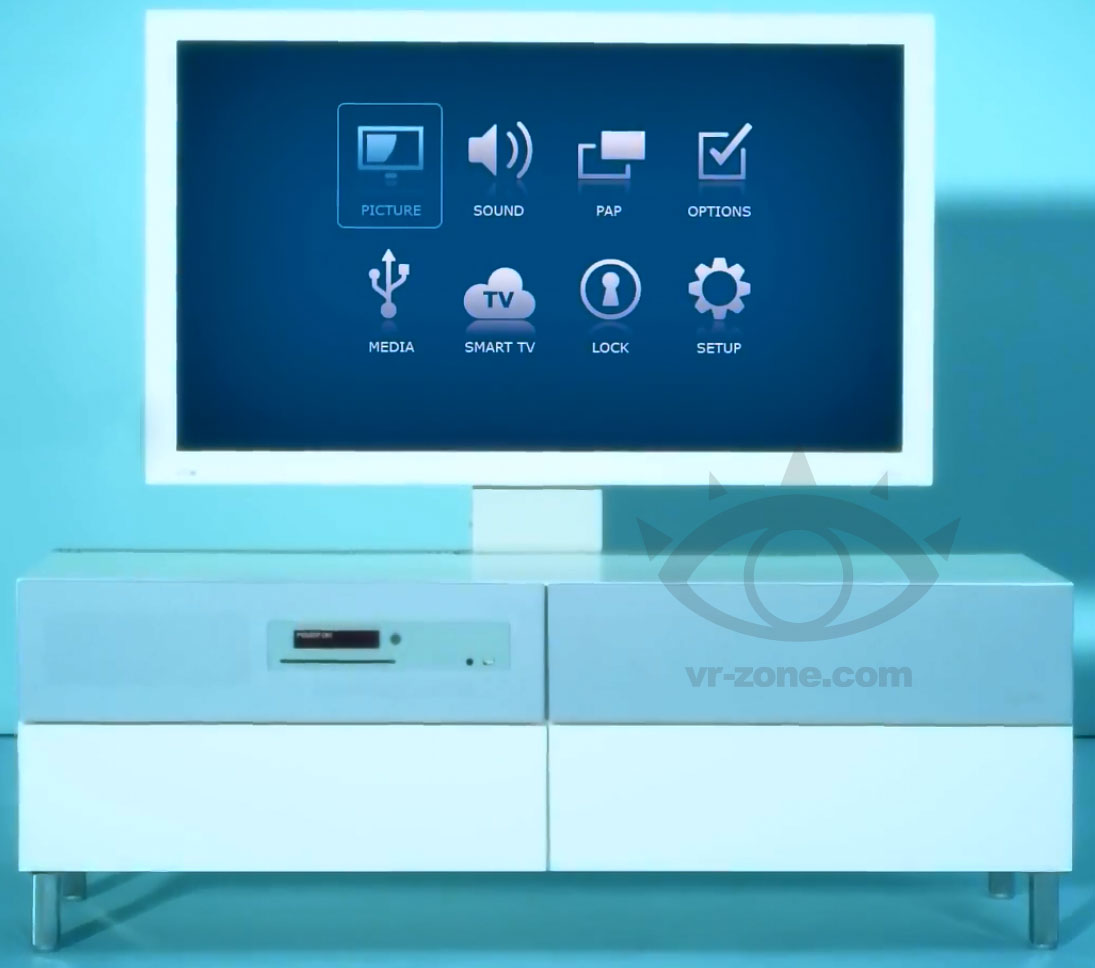
Of course, special attention was given to the cables, plugs and connectors, that are carefully hidden in the area behind the hidden door of the cabinet. This makes the whole setup really clean.
DID YOU KNOW
- Did you know11% of people are left handed
- Did you knowAugust has the highest percentage of births
- Did you knowunless food is mixed with saliva you can't taste it
- Did you knowthe average person falls asleep in 7 minutes
- Did you knowa bear has 42 teeth
- Did you knowan ostrich's eye is bigger than it's brain
- Did you knowmost lipsticks contain fish scales
- Did you knowno two corn flakes look the same
- Did you knowlemons contain more sugar than strawberries
- Did you know8% of people have an extra rib
- Did you know85% of plant life is found in the ocean
- Did you knowRalph Lauren's original name was Ralph Lifshitz
- Did you knowrabbits like licorice
- Did you knowthe Hawaiian alphabet has 12 letters
- Did you know'Topolino' is the name for Mickey Mouse Italy
- Did you knowa lobsters blood is colorless but when exposed to oxygen it turns blue
- Did you knowarmadillos have 4 babies at a time and are all the same sex
- Did you knowreindeer like bananas
- Did you knowthe longest recorded flight of a chicken was 13 seconds
- Did you knowbirds need gravity to swallowDid you knowOFFICIAL VIDEO 3.0
USB AA BATTERIES WILL CHARGE YOUR IPHONE

I loved this idea ever since I saw the picture. It seems that a group of Chinese folks designed the ‘Continuance’ project. As you can see, these are not normal batteries. They feature a USB port that allows you to charge your iPhone.

The Continuance batteries are rechargeable, and they can charge any USB-powered devices (as you see in the picture). I know that this is just a concept design, but considering iPhone's battery draining time, I am really waiting for an actual product like this.

Build This Backyard Water Rocket
Never has learning Newton's third law of motion (equal and opposite reaction) been so much fun. This easy-to-build, kid-friendly water rocket turns any afternoon into a blast.

SAFETY FIRST: Parental supervision strongly advised for build and launch.
· Electric drill with 1/16-, 5/32-, and ¼-inch bits
· One No. 4 size rubber stopper (1 inch long, 1-inch diameter at the fat end)
· One 8-inch length of 3/16-inch (outside diameter) copper tubing
· Bicycle pump with inflation needle
· Heavy card stock
· One 2-liter plastic bottle
· Duct tape
· One drinking straw, minimum ¼-inch diameter
· Four 1-inch-square wood blocks
· One ½-inch plywood board, 12 to 16 inches square
· One ¼-inch threaded steel rod, 18 inches long
· Four ¼-inch nuts
· Two washers, ¼-inch hole, 1-inch diameter

1. Drill a 1/16-inch hole through the middle of the stopper.
2. Widen the hole by drilling the 5/32-inch bit about ½ inch into the top (wider part) of the stopper.
3. Insert the copper tubing into the 5/32-inch hole.
4. Push the inflation needle into the hole in the bottom of the stopper so that it feeds into the copper tube.
5. Make fins from card stock; attach to the bottle with duct tape.
6. Tape the 8-inch drinking straw to the side of the bottle (oriented from top to bottom).
7. Attach square blocks to the corners of the launch platform (plywood), using quick-setting glue or 1¼-inch wood screws.
8. Place the rocket in the center of the launch platform and mark the spot directly below the plastic straw.
9. Drill a ¼-inch hole through the mark; insert the steel rod into the hole, and fix in place with nuts and washers.
10. Attach the bicycle pump to the inflation needle.
11. Fill bottle one-third full with water, below top of copper tube.
12. Push the stopper assembly firmly into bottle's mouth.
13. Invert the rocket, and slide the soda straw onto the rod.
14. Pump air into the rocket. The amount of pressure required to fire the rocket will vary, depending on how clean the seal between the rubber stopper and the rocket is and how firmly the stopper is placed.
15. After several pumps, the pressure inside the rocket will be great enough to overcome the friction holding the stopper in place. Now comes the cool part, as the stopper releases from the rocket, and the rocket launches high into the air, shooting a trail of water behind it. Zoom!
Read more: Early Adopter: Build This Backyard Water Rocket - Popular Mechanics
SAFETY FIRST: Parental supervision strongly advised for build and launch.
Tools and Materials
· Electric drill with 1/16-, 5/32-, and ¼-inch bits
· One No. 4 size rubber stopper (1 inch long, 1-inch diameter at the fat end)
· One 8-inch length of 3/16-inch (outside diameter) copper tubing
· Bicycle pump with inflation needle
· Heavy card stock
· One 2-liter plastic bottle
· Duct tape
· One drinking straw, minimum ¼-inch diameter
· Four 1-inch-square wood blocks
· One ½-inch plywood board, 12 to 16 inches square
· One ¼-inch threaded steel rod, 18 inches long
· Four ¼-inch nuts
· Two washers, ¼-inch hole, 1-inch diameter
Make the Stopper Assembly
1. Drill a 1/16-inch hole through the middle of the stopper.
2. Widen the hole by drilling the 5/32-inch bit about ½ inch into the top (wider part) of the stopper.
3. Insert the copper tubing into the 5/32-inch hole.
4. Push the inflation needle into the hole in the bottom of the stopper so that it feeds into the copper tube.
Build the Rocket
5. Make fins from card stock; attach to the bottle with duct tape.
6. Tape the 8-inch drinking straw to the side of the bottle (oriented from top to bottom).
Build the Launchpad
7. Attach square blocks to the corners of the launch platform (plywood), using quick-setting glue or 1¼-inch wood screws.
8. Place the rocket in the center of the launch platform and mark the spot directly below the plastic straw.
9. Drill a ¼-inch hole through the mark; insert the steel rod into the hole, and fix in place with nuts and washers.
Prepare the Hydro-Pump Rocket for Launch
10. Attach the bicycle pump to the inflation needle.
11. Fill bottle one-third full with water, below top of copper tube.
12. Push the stopper assembly firmly into bottle's mouth.
13. Invert the rocket, and slide the soda straw onto the rod.
Launch the Rocket
14. Pump air into the rocket. The amount of pressure required to fire the rocket will vary, depending on how clean the seal between the rubber stopper and the rocket is and how firmly the stopper is placed.
15. After several pumps, the pressure inside the rocket will be great enough to overcome the friction holding the stopper in place. Now comes the cool part, as the stopper releases from the rocket, and the rocket launches high into the air, shooting a trail of water behind it. Zoom!
Read more: Early Adopter: Build This Backyard Water Rocket - Popular Mechanics
COOLEST GADGETS OF 2012
2012 is almost here so we need to be prepared. Here are some of the coolest gadgets that will be released in 2012 (some presented at IFA Berlon 2011).

Samsung Galaxy 7.7 Tablet
With only 7.89 millimeters thick and weighing 335 grams, the Galaxy 7.7 presents users with a Super AMOLED display that offers high contrast and accurate viewing experience, allowing a wider variety of colors, with better separation between light and shade tones. The battery will last up to 10 hours.

LG Smartscan mouse
The new mouse from LG has a built scanner. All you need to do is press the Smart Scan button located on the left side of the mouse device and roll over the material they want to scan. The scanned image can then be saved in the desired format (PNG, JPEG, TIFF, BMP, PDF, XLS or DOC) or placed in a document or an application with drag & drop. The technology involves a proprietary optical character recognition to convert scanned text to a Microsoft Word document that can be edited if desired. This 2-in-1 device can scan A3 pages.

Sony 3D viewer
One of the most futuristic devices presented at the IFA is "Personal 3D Viewer" from Sony. It is mounted on the head and gives the user a new style of 3D viewing experience. Sony 3D viewer consists of two different displays, one for the left eye and one for the user's right eye. To provide an experience full surround-sound device incorporates headphones.

VIERA Neo Plasma Panasonic: 2D to 3D conversion
The new Panasonic Viera range Neoplasms technology provides an excellent conversion from 2D to 3D image. The new Line is distinguished, are equipped with technology Infinite Black PanelPro, THX certification for their 2D to 3D playback and can connect to certain Internet content viaVIERA Connect. Moreover, they are Wi-Fi ready (via USB) and DLNA certification, offers the possibility of making video calls via Skype, and can playback pictures and videos thanks toVIERA Image Viewer.
PLAY OLD ATARI GAMES ONLINE

It's time to say goodbye to long hours playing Fifa games because we have a new source of cool games in town! This is a Back to the Future moment! Microsoft just announced that it partenered with Atari in order to bring several classic old Atari games online, to your Web browser. All you need is a HTML5-compatible browser like Firefox, Opera, Safari, Google Chrome or Internet Explorer. If you want to have an ad-free experience, you need to play them in the latest version of Internet Explorer.
These games can be accessed on the iPad also.
Click here to Play Old Atari Games Onlinehttp://po.st/gDiinV
Subscribe to:
Posts (Atom)